Steampunk Wedding Stationery
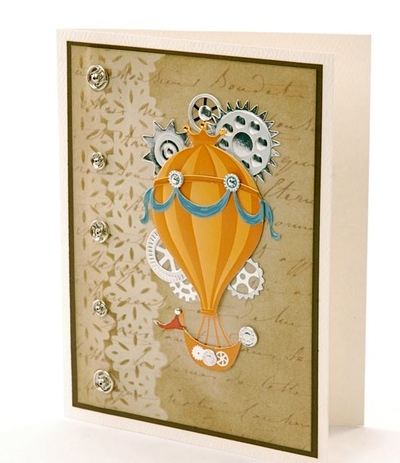
 If you're in the market for wedding invitation templates, bridal shower invitations, or even just thank-you cards for your steampunk wedding, try making this Steampunk Wedding Stationery. It works equally as well for a destination wedding, with the cute hot air balloon and blimp design. The cool, iron gears against a vintage script backdrop is truly unique and jaw-dropping. Your guests will never believe that you made these yourself with just a few simple tools. Try your hand at calligraphy in dark brown ink on the inside of the card for an undeniably steampunk vibe.
Time to Complete: In an evening
Primary Technique: Papercraft

Materials:
- EK Tools Lily Pad 2-in-1 Edger Punch
- Jolee's Boutique Steampunk Flying Machine Stickers
- K&Company Engraved Golden 12x12 Designer Paper Pad
Instructions:
Main Card:
1. Cut a sheet of White Felt Cardstock in half so that it measures 8 ½” x 5 1/2”. Fold the card in half so that it measures 4 ¼” x 5 ½”.
2. Cut a piece of the Engraved Garden Paper with the writing on it so that it measures 3 ¾” x 5”.
3. Using the 2-in-1 Lily punch punch 2 continuous lines from the the vinyl sheet. First punch in the #1 punch position and then by the #2 punch position. NOTE: by sliding the pink while in the open position,but it needs to be in position#1 to close and lock it.
4. Taking both of the strips that you have just punched out of the vinyl, tape them onto your card. You need to have your craft sheet under your project as we are going to color it with Distress Inks. Place your card onto your craft sheet. The craft sheet is a silicone sheet which is fantastic for all of your craft projects. (Don’t cut on top of it though as it isn’t self healing).
5. Starting with the Old Paper Distress Ink, take the blending tool and lightly tap the foam pad onto the ink pad. Using circular motions on the craft sheet, slowly bring the tool onto the paper in a gliding motion. If you need to pick up more ink, repeat the circular motions before bringing the tool into contact with your project. If you forget the circular motions, you will end up wiht a rectangular shape on your project which you will have trouble removing. Always start blending with the lightest color first and then go to the darker color. Hold the Vinyl Stencil in place while you color over the top of them. You want the color to go through the little holes. You don’t want the stencil moving whilst you are working. When you have colored over and around the stencil, color around the rest of the paper.
6. Remove the sticker from its packaging and stick onto your card.
7. Take 5 snaps or buttons and decorate the side of your card.
Inside Card:

1. Cut a piece of brown card 1/8” larger than the colored background. Glue both pieces onto your main card.
2. The decoration of this card continues into the inside. Cut a piece of brown card 3” x 2 5/8”.
3. Take a scrap of cream card. Punch along the shortest edge using the Lily 2 in 1 punch set at position #2. Trim the card down to approximately 5 1/8” x 2 ½”. Fold the top flap down so that you can see the design of the punch poking out. It will measure approximately 2 ¼”
4. Glue this to the brown card and then stick the ballon sticker on the front.
Read NextGraceful Invitation Design