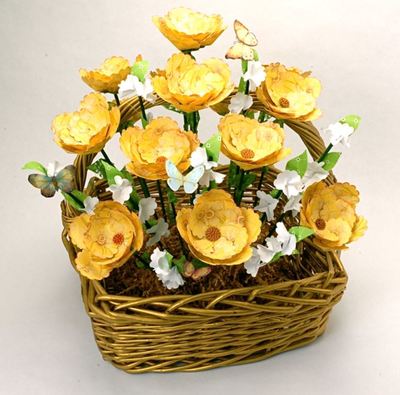
Rustic Paper Flower Basket

Working with paper is a blast, especially when you get to use special punches and stickers. It helps that you can make some truly amazing things with these techniques, such as this Rustic Paper Flower Basket. The versatility of this project is crazy. You can use multiple as some easy centerpieces, or give one to your flower girl and hide the petals within it for her to throw as she walks down the aisle. This flower basket is perfect for rustic weddings because of its whimsical, down-to-earth design.
Time to CompleteIn an evening
Primary TechniquePaper Crafts

Materials List
- EK Tools 2 Inch Scallop Circle Large Punch, Cutter Bee Scissors, and Powder Tool
- Jolees Gold Pearl Cluster Stickers
- Martha Stewart Crafts Mini Glue Gun and Hot Glue Sticks
- K&Company Susan Winget Floral Butterfly Grand Adhesions, Susan Winget Meadow 12x12 Specialty Paper Pad, and Brights Designer Paper Pad
- Green Floral Plant Stakes
- Brown Stamp Pad Cube
- White Paper and Brown Shredded Paper
- Foam
- Basket
- Thin Floral Wire


Instructions
-
Making a Flower:
-
Select paper pattern from the specialty pad. These flowers were made from the yellow jonquil pattern paper.
-
Begin punching the paper with the 2" scallop punch. Each flower is made from 10 scallop circles. To get the most circles from the paper, begin punching from the left bottom side of the paper and proceed to the right. Cut away any excess paper before repeating the process. Continue until desired amount of circles are punched. This basket has 13 large flowers.
-
Using scissors, make a cut from the edge to the center of each scallop circle.
-
Put a drop of hot glue on the scallop to the right of the cut.
-
Overlap with the scallop to the left of the cut.
-
Hot glue a pearl cluster to the top of the floral stake. Let dry.
-
Holding a scallop circle with the glued cut line down, begin gluing 5 circles to the pearl cluster center. Place a small amount of hot glue on the top of the circle. Place under the pearl cluster, and hold in place until the glue sets.
-
Overlap the circles so all 5 circles fit. The last circles fit between two circles by gluing part of the top of one circle and the bottom to another.
-
Begin gluing the second row of circles onto the flower. These will be staggered between the first 5 circles. Hold the cut part of the circle down. Bend back about 1/8". Place the glue on the bent portion and place on the flower. The second set of circles are glued in the middle of the flower - not the bottom, like the first row.
-
Using ink cube, rub over the scallop portion of both rows of circles. This can be done prior to the gluing, but tipping after gluing gives a more random, natural look.
-
Punch a 2" scallop circle from a piece of green paper in the basic pad. Push the end of the floral stake through the center of the circle and slide up under the flower. Hot glue in place. This will make the flowers calyx.
-
Draw leaves or use a pattern. Using scissors, cut two leaves for each flower. Hot glue each leaf to the floral stake.
-
Flower is now complete.
-
White Blossom Stems:
-
Punch out three scallop circles for each blossom stem needed using scallop punch.
-
Cut 3 to 5 green leaves for each stem.
-
Hot glue leaves onto stake. Glue one leaf at top of the stake and remaining leaves spaced below.
-
Fold the white scallop circle in half and then in half again. Open and place a small drop of hot glue in the center of the circle. Gather up the circle again forming a blossom. Hot glue blossoms inside the bottom part of each leaf.
-
Arranging Basket:
-
All basket arrangements will be different as the same basket is not being used.
-
Take block of foam and place in center of the basket. Cover with shredded paper. Wrap a thin piece of wire around the foam and then through the bottom of the basket. Twist the wire ends together to hold foam in place.
-
Determine what shape arrangement is wanted. Begin placing the large blooms in the basket. Start at the top and work down to the bottom. Floral stakes may need to be cut and shortened for the bottom blooms.
-
Fill in between the blossoms with the white blossom stakes.
-
Select butterflies. Remove from release paper and powder the backs using the powder tool. Hot glue the butterflies onto the edges of the flowers and/or leaves.
-
If desired, add additional leaf stakes, ribbons, or embellishments.
Read NextGlittering Wine Bottle Centerpiece