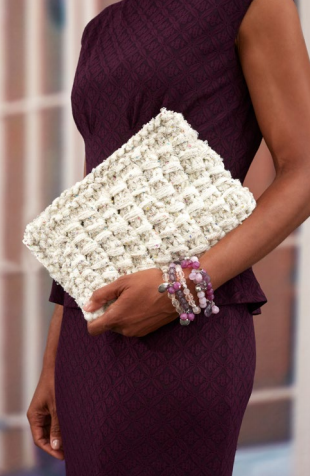
Crochet Bridesmaid Purse

Nothing says from-the-heart like handmade. You want your bridesmaids to look gorgeous on your special day, and you want to show them you care. There's no better way to do that than with a Crochet Bridesmaid Purse. This simple classic clutch purse tutorial will teach you how to create an adorable little purse for the women in your life who matter the most to you. They'll be thanking you when they look classy during the ceremony, and when they have a place to hold their cell phone and makeup!
Time to CompleteIn an evening

Materials
- 861-149 Lion Brand Vanna's Glamour Yarn: Moonstone - 2 Balls
- Lion Brand Crochet Hook - Size F-5
- Large-Eye Blunt Needles (Set of 6)
- Sewing needle and thread
- One magnetic purse closure
Abbreviations:
beg = begin(s)(ning)
rem = remain(s)(ing)
rep = repeat(s)(ing)
sc = single crochet
sl st = slip stitch
st(s) = stitch(es)
Gauge: 1 ripple = 3 1/2 in. (9 cm). BE SURE TO CHECK YOUR GAUGE. When you match the gauge in a pattern, your project will be the size specified in the pattern and the materials specified in the pattern will be sufficient. If it takes you less stitches and rows to make a 4 in. [10 cm] square, try using a smaller size hook; if more stitches and rows, try a larger size hook.
Instructions
PURSE
With A, ch 69.
Row 1: Work 2 sc in 2nd ch from hook, sc in each of next 9 ch, sk next 2 ch, *sc in each of next 10 ch, 3 sc in next ch, sc in each of next 10 ch, sk next 2 ch; rep from * once more; sc in each of next 9 ch, 2 sc in last ch - 3 ripples.
Row 2: Ch 1, turn, working in back loops only, 2 sc in first st, sc in each of next 9 sts, sk next 2 sts, *sc in each of next 10 sts, 3 sc in next st, sc in each of next 10 sts, sk next 2 sts; rep from * once more; sc in each of next 9 sts, 2 sc in last st.
Rep Row 2 until piece measures about 13 in. (33 cm) from beg.
Fill-in Ripples
Note: Fill-in Ripples are worked along one side of piece to create a straight edge.
Row 1: Ch 1, turn, sk first st, sc in first 9 sts, sk next 2 sts, sc in next 9 sts; leave rem sts unworked.
Row 2: Ch 1, turn, sk first st, sc in next 7 sts, sk next 2 sts, sc in next 7 sts; leave rem st unworked.
Row 3: Ch 1, turn, sk first st, sc in next 5 sts, sk next 2 sts, sc in next 5 sts; leave rem st unworked.
Row 4: Ch 1, turn, sk first st, sc in next 3 sts, sk next 2 sts, sc in next 3 sts; leave rem st unworked.
Row 5: Ch 1, turn, sk first st, sc in next st, sk next 2 sts, sc in next st; leave rem st unworked.
Row 6: Ch 1, turn, sk first st, sl st in last st. Fasten off.
Next Fill-in Sk next 3-sc group, following previous filled-in ripple. Join yarn with sc in next st, sc in next 8 sc, sk next 2 sc, sc in next 9 sc; leave rem sts unworked. Rep Fill in Rows 2-6. Fasten off. Fill last ripple in same way.
FINISHING
Fold end with filled-in ripples about 4 1/2 in. (11.5 cm) to form body of Purse. Sew side seams.
Outside Edging
From RS, join yarn with sc in top of side seam. Sc evenly around entire outside edge of flap, then sc across straight top edge of Purse.
Join with sl st in beg sc. Fasten off.
With sewing needle and thread, sew one half of magnetic closure to inside of flap and the other half to front of Purse. Weave in ends.
Read NextSpring Blooms Crochet Shawl Pattern