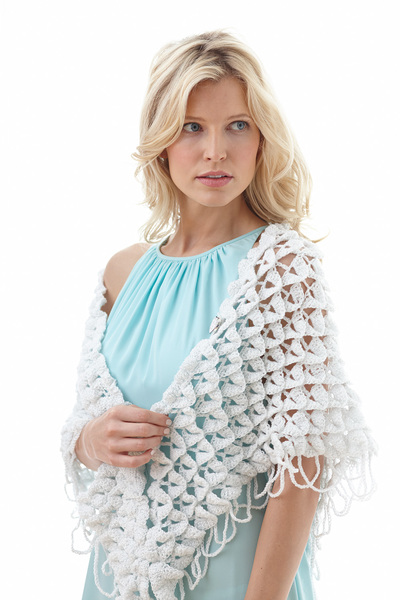
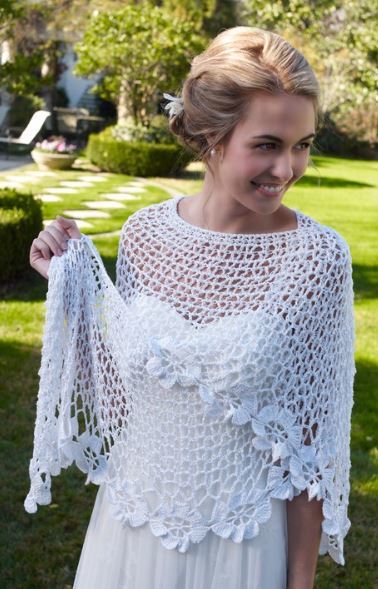
Spring Blooms Crochet Shawl Pattern
This free crochet pattern produces a beautiful crochet wedding shawl you'll want to wear again and again.

Cover your shoulders for your ceremony or keep warm as the sun sets with this stunningly beautiful Spring Blooms Crochet Shawl Pattern.
The delicate romanticism of the piece makes it ideal for the biggest day of your life thus far. If you don't crochet, enlist your mother, or someone else close to you, to make your wedding ensemble personal.
This darling bridal shawl crochet pattern is ideal for a spring wedding with the sweet flower motif and the lightweight design. This is one part of your wedding ensemble that you can wear over and over again once the big day has ended.
If you're a guest who can't figure out what to wear to a spring wedding, break out your favorite summer dress and pair it with this gorgeous crochet wedding shawl.
Don't forget to subscribe to the AllFreeDIYWeddings newsletter for more wedding crafts you love, delivered straight to your inbox every week.
Estimated Cost$21-$30
Time to CompleteLonger than a weekend
MaterialsYarn
Primary TechniqueCrochet

SeasonSpring
Materials List
- AUNT LYDIA’S® Iced Bamboo ™ 3001 Icicle - 8 balls
- Susan Bates® Crochet Hook: 3.75mm [US F-5] (for shawl), 3.25mm [US D-3] (for flower motifs)
- Yarn needle
Instructions
Gauge: One flower motif measures 3¾” (9.5 cm) from petal tip to petal tip. Gauge is not critical for this design.
Measurements: Shawl measures 15” (38 cm) wide (from back neck to lower edge) and 86” (218.5 cm) long (across lower edge).
Notes:
1. Flower motifs are worked in joined rounds with right side facing at all times. Motifs are joined using a “join-as-you-go” technique into a long strip.
2. The body of the shawl is worked beginning across one long edge of the flower motif strip.
First Motif
With smaller hook, ch 5; join with slip st in first ch to form a ring.
Round 1: (right side): Ch 7 (counts as dc, ch 4), dc in ring, [ch 4, dc in ring] 5 times, ch 4; join with slip st in 3rd ch of beginning ch—7 dc and 7 ch-4 spaces.
Round 2: *(Slip st, ch 5, 7 dtr) in next ch-4 space (petal made), ch 1, work 3 slip sts evenly spaced down last dtr made; repeat from * around; join with slip st in same ch- space as first petal–7 petals.
Next Motif (make and join 22 more)
Round 1: Work same as first motif through Round 1—7 dc and 7 ch-4 spaces. Current motif is now completed and joined to the previous motif when working the last two petals. Arrange and join motifs so that there are four petals of each motif across one long edge (lower edge) of strip and three petals of motif across other long edge of strip (top edge).
Round 2: (joining round): *(Slip st, ch 5, 7 dtr) in next ch-4 space (petal made), ch 1, work 3 slip sts evenly spaced down last dtr made; repeat from * 4 more times to make 5 petals; hold current motif and previous motif with wrong sides together and sts matching, following sts are worked into the current motif except when sts of the previous motif are explicitly indicated: (slip st, ch 5, 7 dtr) in next ch-4 space, ch 1, slip st in corresponding dtr of previous motif, ch 1, work 3 slip sts evenly spaced down last dtr made, (slip st, ch 5, slip st in next dtr of previous motif, 7 dtr) in next ch-4 space, ch 1, work 3 slip sts evenly spaced down last dtr made; join with slip st in same ch-space as first petal.
Shawl
Row 1: With larger hook and right side of flower motif strip facing, join yarn with slip st in top of beginning ch-5 of first petal of top edge.
Note: The first petal of the top edge is the first of the three petals at the top of the first motif. The third of the top three petal of the first motif is joined to the 2nd motif. Ch 7, slip st in last dtr of same petal, ch 7, slip st in top of beginning ch-5 of next petal, ch 7, slip st in last dtr of same petal, ch 7, slip st in top of beginning ch-5 of next petal (third petal at top edge of first motif), *ch 7, slip st in last dtr of first petal of next motif, ch 7, slip st in top of beginning ch-5 of next petal, ch 7, slip st in last dtr of same petal, ch 7, slip st in top of beginning ch-5 of next petal; repeat from * across top edge, ch 7, slip st in last dtr of last petal of top edge, turn.
Row 2: Ch 7 (counts as tr, ch 3), slip st in first ch-space, *ch 7, slip st in next ch-space; repeat from * across, ch 3, tr in last slip st, turn.
Row 3: Ch 5, skip first ch-3 space, (dtr, ch 3, dtr) in each ch-space across to last ch-space, dtr in last ch-space, turn.
Row 4: Ch 5, (dtr, ch 3, dtr) in each ch-space across, dtr in top of turning ch,, turn.
Rows 5–7: Ch 5, (dtr, ch 2, dtr) in each ch- space across, dtr in top of turning ch, turn.
Rows 8–11: Ch 4, (tr, ch 2, tr) in each ch- space across, tr in top of turning ch, turn.
Rows 12–14: Ch 4, (tr, ch 1, tr) in each ch- space across, tr in top of turning ch, turn.
Rows 15 and 16: Ch 3 (counts as dc), (dc, ch 1, dc) in each ch-space across, dc in top of turning ch, turn.
Row 17: Ch 1, sc in each dc across skipping all ch-1 spaces. Fasten off.
Finishing
Weave in ends.
-
Alternate view (click to enlarge)
Bonus!
Check out these additional crochet shawl patterns for your wedding!
Abbreviations
- ch
- chain
- dc
- double crochet
- dtr
- double treble crochet
- sc
- single crochet
- st(s)
- stitch(es)
- tr
- treble crochet
- ( )
- work directions in parentheses into same st
- [ ]
- work directions in brackets the number of times specified
- *
- repeat whatever follows the * as indicated
Would you crochet something for your wedding? Leave a comment below and tell us what you plan to make!
Read NextSpring Blooms Crochet Shawl Pattern
Your Recently Viewed Projects
Thanks for your comment. Don't forget to share!
firmaneven 5882818
Dec 21, 2020
I started this and as people say it's confusing, then I saw qa on another site with the same pattern. Actually, you start connecting the flowers during the 2nd round, therefore when speaking of the 1st r the following must be deleted "Current motif is now completed and joined to the previous motif when working the last two petals."
mulberrygalprinces s
Apr 20, 2018
This is so pretty. I love the openness so it doesn't hide the dress. It's not hard to do, but then I have been crocheting for years. I may make a change. What if the basic shawl is done in white, cream or off white and the flowers done in your wedding color?
dianam1980 4964583
Aug 04, 2017
Leave a comment...I've only done first petal, i'm totally confused on to join second petal it's not making sense if you could please help, be much appreciated
jadoredior
May 09, 2017
This is absolutely stunning. My bestie is a huge crochet-er, so I'll be passing this along to her! Thanks!
lbm1120 0678658
Sep 25, 2016
I in the process of making this beautiful shawl. I just finished the 22 flowers. I'm finding this pattern very confusing. Is there a video or more easily explained directions? Please help, Thank you.
Zeemer
Aug 15, 2016
Here's another option for a wedding shawl although personally I find this one a bit short. But I like the rose trimmings on the edges which are the highlight of the shawl. Thanks for having the pattern on the same page making it easy for crocheters.
aracelyavalos 2707 106
Oct 07, 2015
as i can get instructions en spanish?
KathrynAllison
Dec 24, 2015
Hello! Unfortunately, we only provide instructions in English. Perhaps you can try putting the pattern into a translation tool? Hope this helps! -Kathryn, Editor of AllFreeDIYWeddings
cheylonkwoods 6952 313
Jan 22, 2015
Are the motifs created seperately and then joined? If not could you please explain how to do it continually, or point me to a video tutorial for this patterm
Macfe
Dec 11, 2015
Did you ever get an answer because I wanna know how to continue!
KathrynAllison
Dec 24, 2015
Hello! The pattern indicates "Flower motifs are worked in joined rounds with right side facing at all times. Motifs are joined using a join-as-you-go technique into a long strip." Hope this helps! -Kathryn, Editor of AllFreeDIYWeddings
mustangsal59 77568 91
May 03, 2017
In the picture, the flowers appear to be joined at the top of the pedals. But the way I am reading the pattern, the first flower ends with a slip stitch in the first 4 chain space. Then the second flower begins with either with the 5 chain circle or the 7 chaos to start the pedal. Either way the center of the second motif is on the base between the last and first pedals. This does not look correct. Please help.
firmaneven 5882818
Dec 20, 2020
Hello,br /My flowers are quite curly. I connected the last (6th and 7th petal) of first round by ch 2sl st in corresponding ch-4 sp of the previous motifch 1. Then second round I followed the instructions, they're now curly. It's true no good instruction how to join when first round - I invented it but not satisfied.
Report Inappropriate Comment
Are you sure you would like to report this comment? It will be flagged for our moderators to take action.
Thank you for taking the time to improve the content on our site.