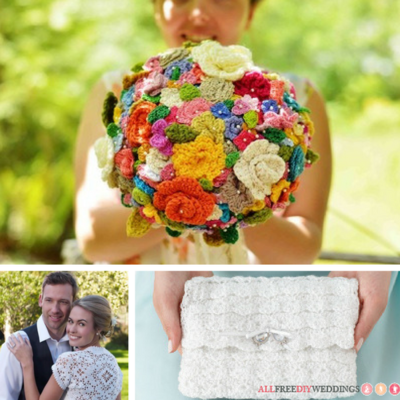
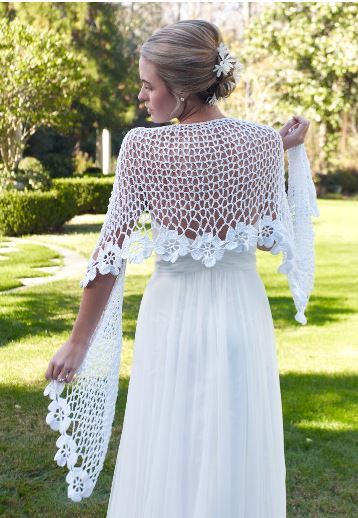
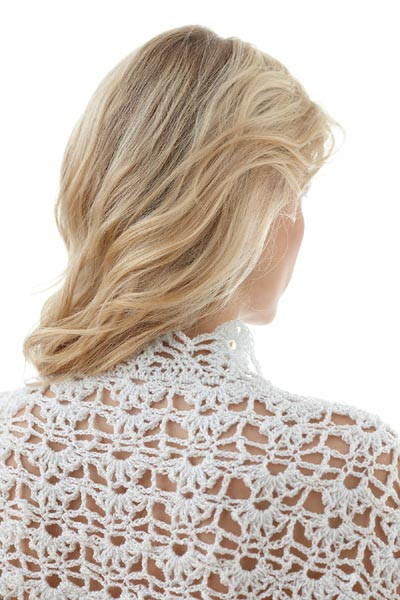
Light and Lacy Bridal Shrug

Unsightly jackets can really ruin a look, and when you're attending something as special as a wedding, appearance is important. Keep covered without hiding your ensemble by throwing on a lovely Light and Lacy Bridal Shrug. Perfect for the bride or guests, this crochet shrug is a beautifully subtle statement. The intricate design is just enough to make it special without overwhelming the rest of the outfit. Free crochet patterns for clothing are wonderful ways to load up your closet without emptying your wallet. This darling piece would make a fantastic DIY gift for any bride!
Estimated Cost$31+
Time to CompleteWeekend project
Primary TechniqueCrochet

Project TypeMake a Project
Materials List
- 861-100 Vanna's Glamour Yarn: Diamond
- Lion Brand Crochet Hook - Size G-6 (4 mm)
- Lion Brand Large-Eye Blunt Needles (Set of 6)
Abbreviations
- beg = begin(s)(ning)
- ch(s) = chain(s)
- ch-space = space previously made
- dc = double crochet
- hdc = half double crochet
- rep = repeat(s)(ing)
- rnd(s) = round(s)
- RS = right side
- sc = single crochet
- sk = skip
- sl st = slip stitch
- sp(s) = space(s)
- st(s) = stitch(es)
- tr = treble (triple) crochet
Stitch Explanation:
- Cl (2 double crochet cluster): Yarn over, insert hook in indicated st and draw up a loop, yarn over and draw through 2 loops on hook (2 loops rem on hook), yarn over, insert hook in same st and draw up a loop, yarn over and draw through 2 loops on hook, yarn over and draw through all loops on hook.
- Cl-shell (cluster shell): Cl in indicated ch-sp, (ch 3, Cl) 4 more times in same ch-sp.
Instructions
Ch 146.
-
Row 1: Sc in 2nd ch from hook, *ch 3, sk next 3 ch, sc in next ch; rep from * to end of row - 37 sc and 36 ch-3 sps.
-
Row 2: Ch 1, turn, sc in first sc, *ch 1, sk next ch-3 sp, Cl-shell in next ch-3 sp, ch 1, sk next ch-3 sp, sc in next sc; rep from * to end of row - 12 Cl-shell at the end of this row.
-
Row 3: Ch 7 (counts as tr, ch 3 in this row and in all following rows), turn, sk first ch-3 sp, (sc in next ch-3 sp, ch 3) twice, tr in next sc, *ch 3, sk next ch-3 sp, (sc in next ch-3 sp, ch 3) twice, tr in next sc; rep from * to end of row - 13 tr and 36 ch-3 sps.
-
Rows 4 and 5: Ch 7, turn, sk first ch-3 sp, (sc in next sc, ch 3) twice, *tr in next tr, ch 3, (sc in next sc, ch 3) twice; rep from * to turning ch, tr in 4th ch of turning ch.
-
Row 6: Ch 1, turn, sc in first tr, ch 1, sk next ch-3 sp, Cl-shell in next ch-3 sp, ch 1, sk next ch-3 sp, *sc in next tr, ch 1, sk next ch-3 sp, Cl-shell in next ch-3 sp, ch 1, sk next ch-3 sp; rep from * to turning ch, sc in 4th ch of turning ch - 12 Cl-shell.
-
Rows 7-38: Rep Rows 3-6 eight more times.
-
Rows 39 and 40: Rep Rows 3 and 4.
Fasten off.
FINISHING
Fold piece in half lengthwise. Beg at end of opposite fold, sew first row and last row together for 2 in. (5 cm) to make armholes.
Armhole Edging
From RS, join yarn with sl st in armhole edge at seam.
-
Rnd 1: Ch 1, work 90 hdc evenly spaced around armhole opening; join with sl st in first hdc.
-
Rnd 2: Ch 1, turn, sc in first 3 hdc, *ch 2, sk next hdc, (2 dc in next hdc, ch 2) twice, sk next 2 hdc, sc in next 5 hdc; rep from * around to last 8 sts, ch 2, sk next hdc, (2 dc in next hdc, ch 2) twice, sk next 2 hdc, sc in last 2 hdc; join with sl st in first sc.
-
Rnd 3: Ch 1, turn, sc in first sc, ch 3, sk next ch-2 sp, (3 dc, ch 2, 3 dc) in next ch-2 sp, *ch 3, sk next sc, sc in next 3 sc, ch 3, sk next ch-2 sp, (3 dc, ch 2, 3 dc) in next ch-2 sp; rep from * to last 3 sc, ch 3, sk next sc, sc in last 2 sc; join with sl st in first sc.
-
Rnd 4: Ch 1, turn, sc in first sc, ch 4, sk next ch-3 sp, (4 dc, ch 2, 4 dc) in next ch-2 sp, ch 4, sk next sc, *sc in next sc, ch 4, sk next ch-3 sp, (4 dc, ch 2, 4 dc) in next ch-2 sp, ch 4, sk next sc; rep from * around; join with sl st in first sc.
-
Rnd 5: *Ch 5, turn, sk next ch-4 sp, (4 dc, ch 2, 4 dc) in next ch-2 sp, ch 5, sc in next sc; rep from * around; join with sl st in first ch of beg ch-5.
Fasten off.
Rep around other armhole edge.
Body Edging
From RS, join yarn with sl st in body edge at seam.
-
Rnd 1: Ch 1, work 250 hdc evenly spaced around body opening; join with sl st in first hdc.
-
Rnds 2-5: Rep Rnds 2-5 of armhole edging.
Weave in ends.
Read NextSpring Blooms Crochet Shawl Pattern
Your Recently Viewed Projects
Thanks for your comment. Don't forget to share!
mulberrygalprinces s
Dec 22, 2017
This is very stylish. It can be used at almost any type wedding. Even here in Florida. It isn't heavy or tightly stitched so the air will move thru it. You can make it in your bridal colors instead of white of you want. Or trim it in your color. Thank you!
jmstump28 9335649
Oct 11, 2016
What, only one size? And what IS the size??? Pretty pattern, but why make it if we can't tell what size it is?
KathrynAllison
Oct 12, 2016
Hello jmstump28 9335649! Yes, the pattern indicates this shrug is one size. The dimensions given are as follows: "About 15 x 25 in. (38 x 65 cm), before edging is added." Hope this helps! -Editors of AllFreeDIYWeddings
Report Inappropriate Comment
Are you sure you would like to report this comment? It will be flagged for our moderators to take action.
Thank you for taking the time to improve the content on our site.