Dazzling Butterfly Paper Lanterns
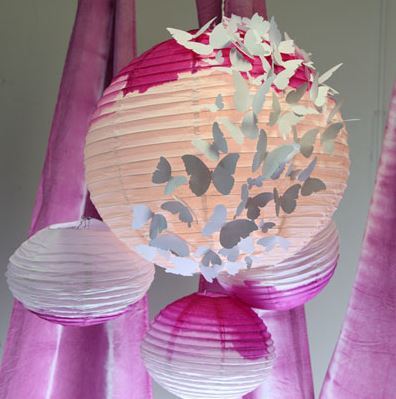
If you want to learn how to make paper lanterns for your wedding, these Dazzling Butterfly Paper Lanterns are your next project. Dipped in a girly pink and swarmed by butterflies, these beauties are perfect for a wedding reception. They are ideal in either spring or summer, and look absolutely breathtaking hanging from tree branches, so try them in your outdoor wedding. DIY wedding ideas for paper lanterns don't get much more beautiful than this, so you're going to want them in your celebration.
Estimated Cost$21-$30
Time to CompleteIn an evening
Primary TechniquePainting

SeasonSpring
Materials List
- Tulip One-Step Tie-Dye Kit - Violet
- Aleene's Always Ready Quick Dry Tacky Glue
- Paper lanterns (assorted sizes)
- Disposable plastic table cover
- Shallow plastic or foam plates
- White paper
- Scissors
- Butterfly template (found online)
- Plastic bowl for dye mixing
Instructions
See below to learn how to make your own paper lanterns
-
Cover work surface with a plastic table cover. Mix dye according to package instructions.
-
In a plastic bowl, mix a small amount of dye with additional water to create a light dilution of violet. Test color on a scrap paper and add additional water or dye to achieve your desired light shade of violet.
-
Pour diluted dye onto one plate and full-strength dye onto another.
-
Dip lanterns into diluted dye in random fashions. Hang to dry.
-
Dip lanterns a second time into full-strength dye and hang to dry.
-
While your lantern dries, begin cutting out your butterflies. Find a template online with butterfly shapes that you like or you can create your own. Trace or print these templates onto standard white paper and cut out as many butterflies as you think you will need. This project used approximately 45 butterflies.
-
Once your lanterns are dry and your butterflies are cut out, begin gluing the butterflies to the lantern using Quick Dry Tacky Glue. For this project the butterflies were grouped together in one area from top to bottom.
-
Hold the butterfly in place for a few seconds and repeat until all butterflies are adhered. Cut out and glue additional butterflies as necessary for desired coverage and design.
-
Hang your lanterns to dry for at least 2 hours.
Read NextBeautiful Bow Decorations
Your Recently Viewed Projects
Marilyn B
Jul 13, 2017
These lanterns are absolutely stunning! The directions for are great and I can attest to the glue mentioned as being super as I use it all,the time for many of my projects. The butterflies add a whimsical touch, and for many people, it has spiritual significance too. I could see making the butterflies with a bit of color as well, or tipping the butterfly wings in some glitter or metallic paint. A great project idea and so festive and vintage too! Love it!
Report Inappropriate Comment
Are you sure you would like to report this comment? It will be flagged for our moderators to take action.
Thank you for taking the time to improve the content on our site.

