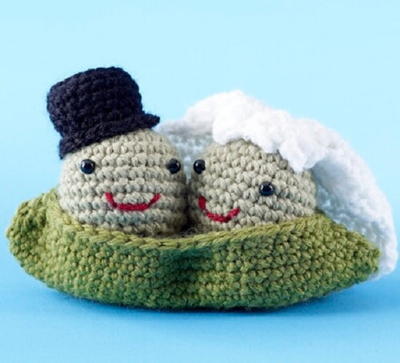
Two Peas in a Pod Amigurumi Crochet Pattern

Give the happy couple the gift of a smile when you present the completed Two Peas in a Pod Amigurumi Crochet Pattern. This adorable crochet amigurumi wedding gift is a sweet way to say congratulations and to stand out amongst the crowd. The ambitious bride could also make these as DIY wedding favors, or, a less daunting task, as a thank you to the bridal party. No matter who the precious present goes to, it is sure to be appreciated since it is clear that time and love were put in. Free amigurumi patterns make for inexpensive yet extremely thoughtful gifts.
Estimated Cost$21-$30
Time to CompleteIn an evening
Primary TechniqueCrochet

Project TypeMake a Project
Materials List
- 620-173 Wool-Ease Yarn: Sage
- 620-174 Wool-Ease Yarn: Avocado
- 620-153 Wool-Ease Yarn: Black
- 620-301 Wool-Ease Yarn: White/Multi
- Lion Brand Crochet Hook - Size G-6 (4 mm)
- Lion Brand Split Ring Stitch Markers
- Lion Brand Large-Eye Blunt Needles (Set of 6)
- Fiberfill stuffing
- Small amount of red yarn
- 4 safety eyes, 4–6 mm diameter
ABBREVIATIONS:
beg = begin(s)(ning)
ch(s) = chain(s)
hdc = half double crochet
rep = repeat(s)(ing)
rnd(s) = round(s)
sc = single crochet
sc2tog = single crochet 2 together
sl st = slip stitch
st(s) = stitch(es)
GAUGE: Exact gauge is not essential to this project.
NOTES: Work in continuous rnds; do not join rnds or turn unless otherwise instructed.
Instructions for PEAS (make 2)
With A, ch 2.
-
Rnd 1: Work 6 sc in 2nd ch from hook. Place marker for beg of rnd; move marker up as each rnd is completed.
-
Rnd 2: 2 sc in each st around—12 sts.
-
Rnd 3: *2 sc in next st, sc in next st; rep from * around—18 sts.
-
Rnd 4: *2 sc in next st, sc in next 2 sts; rep from * around—24 sts.
-
Rnds 5–10: Sc in each st around.
Following package directions, attach safety eyes. Stuff Pea firmly. -
Rnd 11: *Sc2tog, sc in next 2 sts; rep from * around—18 sts.
-
Rnd 12: *Sc2tog, sc in next st; rep from * around—12 sts.
-
Rnd 13: (Sc2tog) 6 times—6 sts.
Fasten off.
Instructions for POD
With B, ch 17.
-
Rnd 1: Sc in 2nd ch from hook, sc in next 2 ch, 2 sc in each of next 2 ch, sc in next 6 ch, 2 sc in each of next 2 ch, sc in next 2 ch, 2 sc in last ch; working along opposite side of foundation ch, sc in next 2 ch, 2 sc in each of next 2 ch, sc in next 6 ch, 2 sc in each of next 2 ch, sc in next 3 ch—40 sts.
Place marker for beg of rnd; move marker up as each rnd is completed. -
Rnd 2: Sc in first 4 sts, 2 sc in each of next 2 sts, sc in next 8 sts, 2 sc in each of next 2 sts, sc in next 8 sts, 2 sc in each of next 2 sts, sc in next 8 sts, 2 sc in each of next 2 sts, sc in last 4 sts—48 sts.
-
Rnd 3: 2 sc in next st, sc in next 22 sts, 2 sc in each of next 2 sts, sc in next 22 sts, 2 sc in last st—52 sts.
-
Rnd 4: 2 sc in next st, sc in next 24 sts, 2 sc in each of next 2 sts, sc in next 24 sts, 2 sc in last st—56 sts.
-
Rnd 5: 2 sc in next st, sc in next 26 sts, 2 sc in each of next 2 sts, sc in next 26 sts, 2 sc in last st—60 sts.
-
Rnd 6: 2 sc in next st, sc in next 28 sts, 2 sc in each of next 2 sts, sc in next 28 sts, 2 sc in last st—64 sts.
-
Rnd 7: Sc in each st around.
-
Rnd 8: Sc2tog, sc in next 28 sts, (sc2tog) twice, sc in next 28 sts, sc2tog—60 sts.
-
Rnd 9: Sc2tog, sc in next 26 sts, (sc2tog) twice, sc in next 26 sts, sc2tog—56 sts.
-
Rnd 10: Sc2tog, *sc in next 10 sts, (sc2tog) twice; rep from * 2 more times, sc in next 10 sts, sc2tog—48 sts.
-
Rnd 11: Sc2tog, *sc in next 8 sts, (sc2tog) twice; rep from * 2 more times, sc in next 8 sts, sc2tog—40 sts.
Fasten off.
Instructions for HAT
With C, ch 2.
-
Rnd 1: Work 6 sc in 2nd ch from hook. Place marker for beg of rnd; move marker up as each rnd is completed.
-
Rnd 2: 2 sc in each st around—12 sts.
-
Rnd 3: *2 sc in next st, sc in next st; rep from * around—18 sts.
-
Rnd 4: Working in back loops only, sc in each st around.
-
Rnds 5–8: Sc in each st around.
-
Rnd 9: Working in front loops only, *2 sc in next st, sc in next 2 sts; rep from * around—24 sts.
Fasten off.
Instructions for VEIL
Beg at face edge, with D, ch 5.
-
Row 1: Sc in 2nd ch from hook and in each ch across—4 sts.
-
Row 2: Ch 2, turn, 4 hdc in each st across—16 sts.
-
Rows 3–7: Ch 2, turn, hdc in each st across.
-
Row 8 (ruffle): Ch 1, turn, *(sc, hdc) in next st, (hdc, sc) in next st, sl st in next st; rep from * 4 more times, sc in last st.
Fasten off.
Instructions for FLOWER (make 3)
With D, ch 2.
-
Rnd 1: (Hdc, sl st) 6 times in 2nd ch from hook. Fasten off.
Instructions for FINISHING
-
With small amount of red yarn, embroider smiles on Peas. Sew Hat on top of one Pea. Sew Veil on top of other Pea. Sew Flowers along face edge of Veil.
-
Weave in ends.
Your Recently Viewed Projects
Thanks for your comment. Don't forget to share!
mulberrygalprinces s
Dec 15, 2017
This is so adorable. It had me smiling the minute I saw it. I have a friend who is getting married and I know she would love this. I can see her hanging it from her cars mirror. I am going to make it and embroider their names on it too.
KathrynAllison
Feb 24, 2017
This is too cute! The happy couple would love to receive such a thoughtful, handmade gift.
Report Inappropriate Comment
Are you sure you would like to report this comment? It will be flagged for our moderators to take action.
Thank you for taking the time to improve the content on our site.