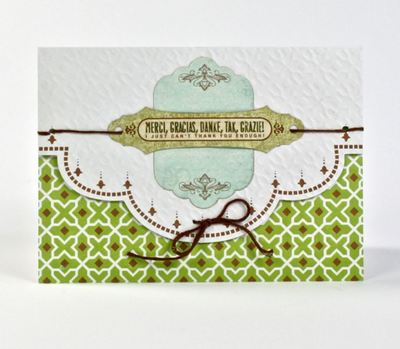
Merci, Gracias, Danke Thank You Card

If you just can't say thank you enough for your guests' involvement in your wedding and their lovely gifts, make them a Merci, Gracias, Danke Thank You Card for a lovely place to express your gratitude to them. We love these cards for multilingual or travel-loving families and couples, and therefore would be perfect for a destination wedding, but these DIY thank you cards are also country-chic enough to fit in at a rustic wedding. Be sure to get started on these cards before the wedding is over so you can send them out as soon as possible.
Time to CompleteIn an evening
Primary TechniquePaper Crafts

Project TypeInvitations and Stationary
Materials List
- K&Company Beyond Postmarks Floral Die-Cut Cardstock
- K&Company Beyond Postmarks Letterpress Sentiments Sticker Pad
- EK Tools Cutter Bee Scissors
- EK Tools Heavy Duty Punch: 1/8" circle
- EK Tools HERMA Dotto Permanent Dot Adhesive: Black
- Brown embroidery floss
- Needle
Instructions
-
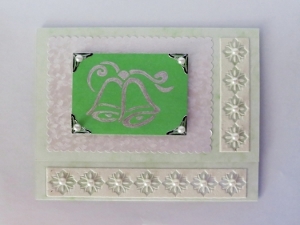
Select a note card from the pack. The design uses the note card option with the white lacy top and green pattern. Note: These cards are reversible which allows a white top with a printed bottom, or a printed top with a white bottom.
-
Select two pieces from the floral die cut cardstock package. This design used the Merci Gracias salutation and a blue tag.
-
Adhere the tag to the center of the white card top with the permanent adhesive.
-
The thank you salutation is sewn onto the card with the brown floss. Lay the thank you piece on top of the tag. Measure 1" from the holes on each side and mark with a pencil. Using the paper punch, punch one hole on each side of the thank you piece.
-
Thread needle with 5 pieces of brown floss. Thread the needle through the back side of the hole to the front of the card. Knot off end to secure floss in place. Thread the thank you piece onto the thread. Place over the center of the tag and secure in place with a bit of permanent adhesive. Finish by threading the needle through the final hold and knotting from the back side of the card to hold in place. Cut off any remaining threads.
-
Write a personal sentiment inside the card.
-
To create the tie bow, thread the needle through the front of the card to the back and return from the back to the front. Leave enough length on floss so that it can be tied into a bow.