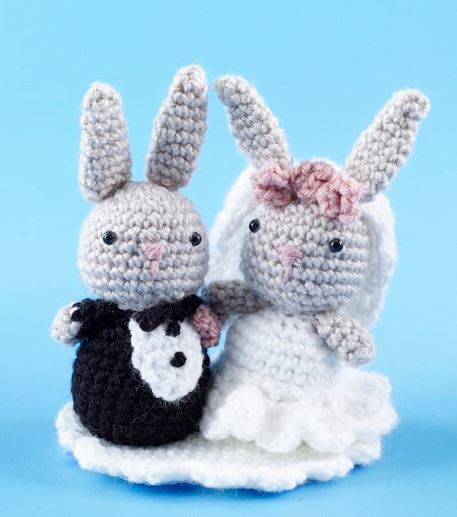
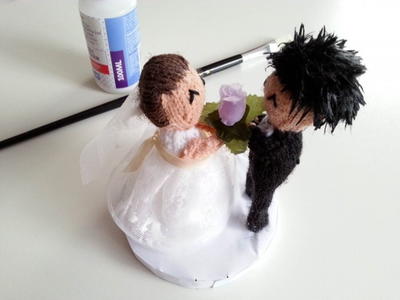
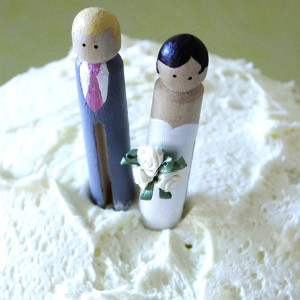
Amigurumi Bunny Wedding Cake Topper
 In many cultures, rabbits symbolize comfort, fertility, and growth. This makes them the perfect animal to symbolize a marriage. This Amigurumi Bunny Wedding Cake Topper pattern will give you a meaningful (and really cute) cake decoration for your wedding. The two little rabbits are even dressed up like the bride and groom for a little more aww-factor. Free crochet amigurumi patterns for wedding cake toppers are difficult to find, so use this one while you still can. It makes a perfect gift from the mother of the bride or groom who loves to crochet.
Time to Complete: In a weekend
Primary Technique: Crochet

Materials:
- 860-099 Lion Brand Vanna's Choice® Yarn: Linen - 1 Ball (A)
- 860-153 Lion Brand Vanna's Choice® Yarn: Black - 1 Ball (B)
- 860-100 Lion Brand Vanna's Choice® Yarn: White - 1 Ball (C)
- Lion Brand Crochet Hook - Size G-6
- Lion Brand Stitch Markers Large-Eyed Blunt Needles
- 4 safety eyes, 6 mm
- Small amount of pink yarn
- Fiberfill stuffing
Measurements: About 6 x 6 in. (15 x 15 cm)
Abbreviations:
ch(s) = chain(s)
dc = double crochet
hdc = half double crochet
rep = repeat(s)(ing)
rnd(s) = round(s)
sc = single crochet
sl st = slip stitch
st(s) = stitch(es)
Gauge: EXACT GAUGE IS NOT ESSENTIAL FOR THIS PROJECT. BE SURE TO CHECK YOUR GAUGE. When you match the gauge in a pattern, your project will be the size specified in the pattern and the materials specified in the pattern will be sufficient. If it takes you less stitches and rows to make a 4 in. [10 cm] square, try using a smaller size hook or needles; if more stitches and rows, try a larger size hook or needles.
Stitch Explanation:
sc2tog (sc decrease): Insert hook into st and draw up a loop. Insert hook into next st and draw up a loop. Yarn over, draw through all 3 loops on hook.
Notes:
- Work in continuous rnds; do not join rnds or turn unless otherwise instructed.
- To change color, work last st of old color to last yarn over; yarn over with new color and draw through all loops on hook to complete st.
Instructions
HEAD (make 2)
With A, ch 2.
Rnd 1: Work 6 sc in 2nd ch from hook. Place marker for beginning of rnd; move marker up as each rnd is completed.
Rnd 2: 2 sc in each st around—12 sts.
Rnd 3: *2 sc in next st, sc in next st; rep from * around—18 sts.
Rnd 4: *2 sc in next st, sc in next 2 sts; rep from * around—24 sts.
Rnds 5–10: Sc in each st around.
Rnd 11: *Sc2tog, sc in next 2 sts; rep from * around—18 sts.
Rnd 12: *Sc2tog, sc in next st; rep from * around—12 sts.
Fasten off.
BODY (make 1 with B and 1 with C)
Ch 2.
Rnds 1–4: Work Rnds 1–4 of Head—24 sts.
Rnds 5–11: Sc in each st around.
Rnds 12 and 13: Work Rnds 11 and 12 of Head—12 sts.
Fasten off.
ARM (make 2)
Groom
With A, ch 2.
Rnd 1: Work 6 sc in 2nd ch from hook. Place marker for beginning of rnd; move marker up as each rnd is completed.
Rnd 2: Sc in each st around; change to B in last st.
Rnds 3–5: Sc in each st around. Fasten off.
Bride
With A, ch 2.
Rnd 1: Work 6 sc in 2nd ch from hook. Place marker for beginning of rnd; move marker up as each rnd is completed.
Rnds 2–5: Sc in each st around. Fasten off.
EAR (make 4)
With A, ch 2.
Rnd 1: Work 4 sc in 2nd ch from hook. Place marker for beginning of rnd; move marker up as each rnd is completed.
Rnd 2: Sc in each st around.
Rnd 3: *2 sc in next st, sc in next st; rep from * once more—6 sts.
Rnd 4: Sc in each st around.
Rnd 5: *2 sc in next st, sc in next 2 sts; rep from * once more—8 sts.
Rnds 6–9: Sc in each st around.
Fasten off.
GROOM'S VEST
With C, ch 5.
Row 1: Sc in 2nd ch from hook and in each ch across—4 sts.
Rows 2–4: Ch 1, turn, sc in each st across.
Row 5: Ch 1, turn, (sc2tog) twice—2 sts.
Row 6: Ch 1, turn, sc2tog—1 st.
Fasten off.
BRIDE'S SKIRT
With C, ch 25.
Row 1: Sc in 2nd ch from hook and in each ch across—24 sts.
Row 2: Ch 1, turn, 2 sc in each st across—48 sts.
Row 3: Ch 1, turn, sc in each st across.
Row 4 (ruffle): Ch 1, turn, *(sc, hdc) in next st, dc in next st, (hdc, sc) in next st, sl st in next st; rep from * across.
Fasten off.
VEIL
With C, ch 4.
Row 1: Sc in 2nd ch from hook and in each ch across—3 sts.
Row 2: Ch 1, turn, sc in each st across.
Row 3: Ch 2, turn, 3 hdc in each st across—9 sts.
Row 4: Ch 2, turn, 2 hdc in each st across—18 sts.
Rows 5–7: Ch 2, turn, hdc in each st across.
Row 8 (ruffle): Ch 1, turn, *(sc, hdc) in next st, (hdc, sc) in next st, sl st in next st; rep from * across.
Fasten off.
FLOWER (make 4 – 3 for Bride's Veil, 1 for Groom)
With small amount of pink yarn, ch 2.
Rnd 1: (Hdc, sl st) 6 times in 2nd ch from hook. Fasten off.
BASE
With C, ch 2.
Rnd 1: Work 6 sc in 2nd ch from hook. Place marker for beginning of rnd; move marker up as each rnd is completed.
Rnd 2: 2 sc in each st around—12 sts.
Rnd 3: *2 sc in next st, sc in next st; rep from * around—18 sts.
Rnd 4: *2 sc in next st, sc in next 2 sts; rep from * around—24 sts.
Rnd 5: *2 sc in next st, sc in next 3 sts; rep from * around—30 sts.
Rnd 6: *2 sc in next st, sc in next 4 sts; rep from * around—36 sts.
Rnd 7: *2 sc in next st, sc in next 5 sts; rep from * around—42 sts.
Rnd 8: *2 sc in next st, sc in next 6 sts; rep from * around—48 sts.
Rnd 9: *2 sc in next st, sc in next 7 sts; rep from * around—54 sts.
Rnd 10: *2 sc in next st, sc in next 8 sts; rep from * around—60 sts.
Rnd 11 (ruffle): *(Sc, hdc) in next st, dc in next st, (hdc, sc) in next st, sl st in next st; rep from * around.
Fasten off.
FINISHING
Following package directions, attach safety eyes to faces. Firmly stuff each Head and sew one to each Body. Sew 2 Ears to top of each Head. Stuff Arms lightly and sew B colored Arms to B colored Body, and A colored Arms to C colored Body. With a scrap of pink yarn, embroider a nose on each face.
For the groom:
Arrange Vest piece onto center of chest and sew in place. Tie a short length of B around neck for tie, and emboider French knots for buttons. Sew one Flower onto chest.
For the bride:
Arrange Skirt around the Body and sew in place. Sew Veil onto top of Head. Sew 3 Flowers on top of Veil. Sew Bride and Groom to Base.
Weave in ends.
Read NextAmigurumi Bunny Wedding Cake Topper