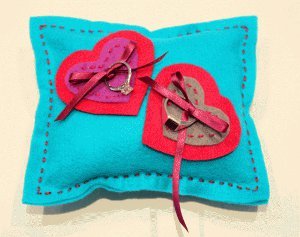
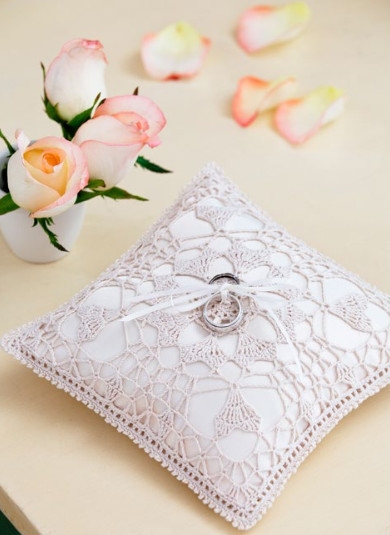
Elegant Ring Bearer's Pillow

The Elegant Ring Bearer's Pillow is truly in a league of its own. You can create this unique wedding ceremony idea using knitting needles and crochet thread. The end-result is a beautiful way to display those oh-so-important wedding bands. The knit lace strip shows up beautifully on the beige linen pillow and the best part is you can change the color in order to match the colors of the wedding party. If you have a particular wedding theme in mind, this free knitting pattern is incredibly versatile and makes a big impact. You won't need to worry about losing your rings if you take advantage of this beautiful pillow with a delicate knit accent.
Estimated Cost$11-$20
Time to CompleteIn an evening
Primary TechniqueKnitting

Materials List
- AUNT LYDIA’S® Classic Crochet Thread, Size 10: 1 ball 1 White
- Susan Bates® Knitting Needles: 3.25mm [US 3]
- 7 x 7” (18 x 18 cm) pillow form, two 8 x 8” (20.5 x 20.5 cm) squares of beige colored linen, 24” (61 cm) length of 3 ?8” (10mm) wide white ribbon, sewing needle and matching thread, stitch markers, tapestry needle
Pillow Cover
1. Pillow cover is worked from side to side.
2. Stitch markers are used to separate first and last two stitches from remaining stitches. Use of stitch markers in this manner is optional.
3. First and last two stitches are worked in Garter stitch (knit every row). Lace pattern is worked between markers.
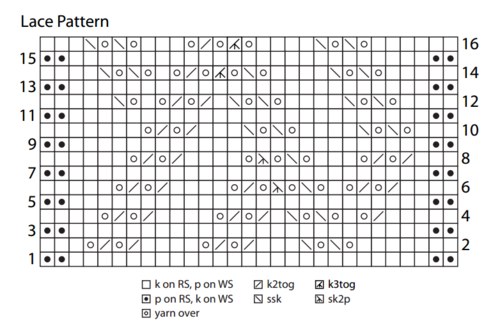
4. Lace pattern can be worked by reading written instructions or following chart.
Cast on 29 sts.
Garter Stitch Border
Work in Garter st (knit every row) for 4 rows.
Begin Lace Pattern
Row 1 (wrong side): K2, place marker, p25, place marker, k2.
Row 2: K2, slip marker, k5, [yo, ssk] twice, k3, [k2tog, yo] twice, k4, [k2tog, yo] twice, k1, slip marker, k2.
Row 3 and all wrong side rows: Knit to marker, slip marker, purl to next marker, slip marker, knit to end of row.
Row 4: K2, slip marker, k3, k2tog, yo, k1, [yo, ssk] twice, k1, [k2tog, yo] twice, k4, [k2tog, yo] twice, k2, slip marker, k2.
Row 6: K2, slip marker, k2, [k2tog, yo] twice, k1, yo, ssk, yo, sk2p, yo, k2tog, yo, k4, [k2tog, yo] twice, k3, slip marker, k2.
Row 8: K2, slip marker, k1, [k2tog, yo] twice, k3, yo, ssk, yo, sk2p, yo, k4, [k2tog, yo] twice, k4, slip marker, k2.
Row 10: K2, slip marker, k1, [yo, ssk] twice, k4, [yo, ssk] twice, k3, [k2tog, yo] twice, k5, slip marker, k2.
Row 12: K2, slip marker, k2, [yo, ssk] twice, k4, [yo, ssk] twice, k1, [k2tog, yo] twice, k1, yo, ssk, k3, slip marker, k2.
Row 14: K2, slip marker, k3, [yo, ssk] twice, k4, yo, ssk, yo, k3tog, yo, k2tog, yo, k1, [yo, ssk] twice, k2, slip marker, k2.
Row 16: K2, slip marker, k4, [yo, ssk] twice, k4, yo, k3tog, yo, k2tog, yo, k3, [yo, ssk] twice, k1, slip marker, k2.
Repeat Rows 1–16 until piece measures 10¼” (26 cm) from beginning.
Garter Stitch Border
Work in Garter st for 4 rows.
Bind off loosely
Finishing
Hold linen squares with right sides together and sew three sides together to form pillow case. Turn pillow case right side out. Insert pillow form into pillow case. Sew the last side. Block pillow cover. Place cover on top part of pillow, wrapping edges to back side of pillow and sew in place. Make a bow with the ribbon and sew to pillow at center lower edge of cover.
Abbreviations
- ssk
- Slip next 2 stitches, one at a time as if to knit, to right needle, insert point of left needle through front of sts, knit these sts together through back loop
- sk2p
- Slip next stitch as if to knit to right needle, k2tog, lift slipped st over the k2tog st and off needle
- k
- knit
- k2tog
- knit next 2 sts together
- k3tog
- knit next 3 sts togethe
- st(s)
- sttich(es)
- yo
- yarn over
- []
- work directions in brackets the number of times specified
NotesGAUGE: 27 sts = 4” (10 cm); 32 rows = 4” (10 cm) in Lace pattern. CHECK YOUR GAUGE. Use any size needles to obtain the gauge.
Pillow measures 7 x 7” (18 x 18 cm) square. Pillow cover measures 4½ x 10½” (11.5 x 26.5 cm)
Your Recently Viewed Projects
Thanks for your comment. Don't forget to share!
KathrynAllison
Apr 01, 2016
What a sweet idea for the ceremony! If you love to knit, this is a great gift for a lucky bride.
Report Inappropriate Comment
Are you sure you would like to report this comment? It will be flagged for our moderators to take action.
Thank you for taking the time to improve the content on our site.