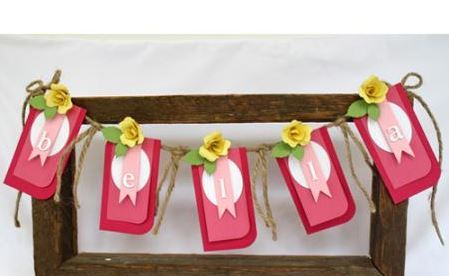
Blossoming Bella Banner
Ordering your wedding decor can be tedious, and there aren't that many unique wedding ceremony ideas out there. Instead, try making a Blossoming Bella Banner, a fresh, spring-like addition to your special day. This banner is simple enough to be hung at the altar, but festive enough for the reception. Made with bright yellow paper flowers, the decidedly feminine touch is just the thing for a spring wedding. Alter the words to say your last name, or whatever phrase you feel would be best, to give it a truly personal touch.

Time to Complete: In an evening
Occasion/Theme: Spring
Spellbinders Materials:
- S2-067 Create A Rose
- S4-112 Classic Ovals SM
- S5-029 Nested Lacey Pennants
- S5-199 Font One - Lowercase
- S6-013 5 x 7 Modern Stationery
- GC-001 Spellbinders® Grand Calibur® Die Cutting and Embossing Machine
Other Materials:
- Beacon Adhesive: 3-in-1 Advanced Craft Glue
- Bazzill Basics Papers®: Tink Pink Cardstock
- Scrapbook Adhesives by 3L® - 3D Foam Squares
- WorldWin Papers ®: Light Pink, White, Pink, Green and Yellow Cardstock
- Twine
- Hole Punch
Instructions
1. To create the banner’s base, cut and emboss 1 each of the following using the Grand Calibur Machine (repeat this process five times):
- 5 x 7 Modern Stationery Die #2 ( #1 die is the smallest size) from Tink Pink
- 5 x 7 Modern Stationery Die #1 from Light Pink
- Nested Lacey Pennants Ribbon Die #2 from light pink
- Classic Ovals SM Die #3 from white
2. Cut and emboss b, e, l, l, a from Font One – Lowercase set in white.
3. Cut and emboss to create five small roses from Create A Rose set in yellow (green for the leaves).
4. Assemble each pennant as follows from bottom up: 5 x 7 Modern Stationery Die Cut #2, 5 x 7 Modern Stationery Die Cut #1, Classic Ovals Die Cut #3, Nested Lacey Pennants Ribbon Tail Die Cut #2 and Font One - Lowercase letter on top.
5. Adhere each layer using Beacons 3-in-1 Advanced Craft glue except for the letter on top. Use a foam square cut in half to adhere the letter to the pennant.
6. Use a hole punch to punch two holes ½” apart and about a ¼” down from the center section of each pennant.
7. String each pennant through twine.
8. Adhere rose leaves and roses to the center top section of each pennant (covering the punched holes and threaded twine) using a combination of foam squares and glue.
9. Cut piece of twine to desired length and tie in between each pennant on the banner.
10. Attach to frame tying a bow in each end of the banner.
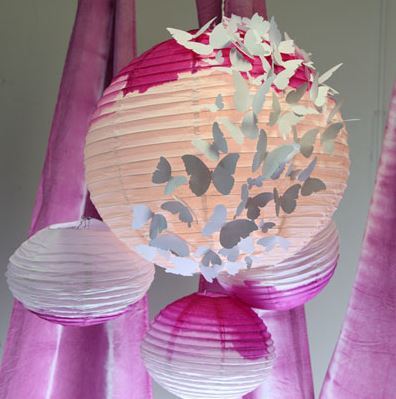
Read NextDazzling Butterfly Paper Lanterns