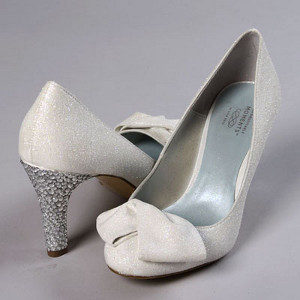
My Little Secret Sparkling Heels

Only you will know how little your dazzling shoes cost. You will receive compliment after compliment on your big day regarding your My Little Secret Sparkling Heels. They'll glitter and glisten under your beautiful gown, and family and friends will get glimpses of the stunners as your dress swishes while you float down the aisle. They'll beg to see more of your must-have glitter pumps and insist your spill the beans on where to get them. Smile proudly knowing that the glam heels took you only hours and a few dollars to complete. Learn how to bedazzle heels in a few easy steps with this simple tutorial. Once the big day has passed, you'll be searching for another occasion where you can show off your DIY glitter shoes.
Time to complete: Weekend project

Estimated Cost: $21-$30
Materials:
- Tulip® Fashion Glitter® -Multi Ultra Fine (23532)
- Liquid Fusion® Clear Urethane Glue
- Tulip® Glam-It-Up!™ Iron-On Crystals™ -Clear (23123)
- Tulip® Fashion Glitter® Bond
- Tweezers
- Scratch paper
- High-heels – white
Instructions:
1. Working in small sections at a time, squeeze dots of Liquid Fusion onto heels of shoes.
2. Place large crystals into dots of glue. Let set.
3. Fill in spaces with dots of glue and crystals until heels are completely covered. Let dry.
4. Cover work surface with scratch paper to catch excess glitter to reuse.
5. Use sponge applicator from package to dab Glitter Bond onto shoes, working in small sections at a time.
6. Pour glitter over glue until completely covered, then press with finger to set. Let dry then shake off excess and pour back into container for reuse.
Read NextVintage Flapper Wedding Dress