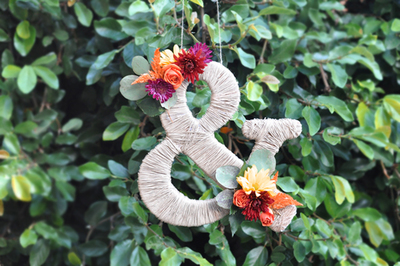
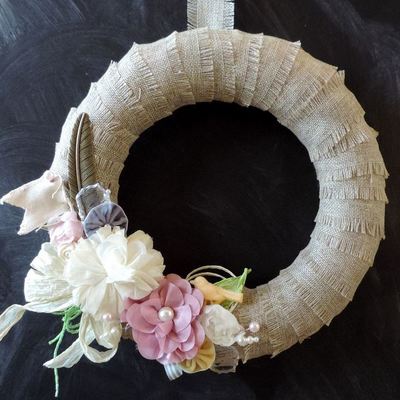
Sweet Country Burlap Wreath

For the perfect touch to your rustic wedding, make this Sweet Country Burlap Wreath. It's almost impossible to believe that something so charming doesn't have to come from a store. If you can glue and pin fabric, you can easily finish this adorable wreath. Hang it on the door to your wedding ceremony to help tie in your theme to the marriage itself, or hang a few in the reception area for some darling, easy decor. Get creative and attach the ornaments in any way you want to truly personalize your wreath.
Time to CompleteIn an evening

Materials List
- 2 Sets of Maya Road Afternoon Tea Blossoms - Carnation and Milk
- 2 Maya Road Afternoon Tea Trim Packs - Carnation and Milk
- Maya Road Burlap Trim
- Maya Road Cream Pearl Ball Pins
- Maya Road Feathered Friend Resin Embellishments - Sand
- Maya Road Mini Pennant Banner Canvas Set
- Maya Road Paper Twine Cording - Khaki, Cloud, and Grass
Instructions
-
Start with a 10 inch straw wreath. Starting on the backside, wrap some of Maya Road Burlap Trim around the wreath. Overlap by about one-fourth an inch as you go. You can complete this in steps and glue the ends to the back as needed. You will need about five and a half yards of the burlap trim to go around the entire wreath.
-
Take about 24 inches of the Cloud Paper Twine Cording. Unravel and form a bow. You will want to make a bow that has four loops total and two tails.
-
Take one of each of the Afternoon Tea Trim flowers (in the light pink and cream). Trim off about 60 percent of the flower until you have formed some small ones.
-
Take a 24 inch piece of the solid lime green twine cording. Make 8 total loops and then take a 8 inch piece to tie and make a bow. You will have a bow that has 8 loops and 8 tails. The bow should be approximately 3 inches wide.
-
Take a 4 inch piece of the Grass Paper Twine Cording. Unravel and pinch ends to form a leaf.
-
Using the photo as a guide, assemble the wreath embellishments as shown. Add flowers first, then bows, feather, leaf, paper twine cording loops, pins and beads.
Your Recently Viewed Projects
Thanks for your comment. Don't forget to share!
KathrynAllison
Feb 10, 2017
I really love the simplicity of this wreath. I'm not a huge fan of rustic weddings, but I can get behind this decoration.
Report Inappropriate Comment
Are you sure you would like to report this comment? It will be flagged for our moderators to take action.
Thank you for taking the time to improve the content on our site.